 Today, my best friend and I celebrated our 35th wedding anniversary. This song says it best:
Wednesday, August 19, 2009
35th anniversary
Today, my best friend and I celebrated our 35th wedding anniversary. This song says it best:Saturday, August 15, 2009
Granny's rose
 The recent Hexed Granny Motif was such a hit that the loom knitted granny square tutorial is in the works. This post is a quick glimpse of the upcoming tutorial. In an effort to keep the tutorial as simple as possible I thought it best to start with a basic generic granny square instead of the more complex hexagonal granny. While unable to physically knit over the past week, I've been mentally knitting the loomy granny motif. Today, I finally had a chance to sit down (if you don't count jumping up every three minutes to extract my granddaughter from countless "no-no's") and test knit the tutorial square. The result is the Granny Rose Square pictured above.
Colors: When selecting colors for these squares I've found that nature provides the best color combinations. The color scheme on the square above reminds me of a rose bud pattern woven into a beautiful bedspread that my Grandmother used on special days when I was a child - thus the name, Granny's Rose. By substituting a different floral color (coral, violet, yellow, blue), the square acquires a new look. By the way, my initial impression of granny squares was not a good one, mainly due to the hideous color combination in outlandish projects of the seventies (example). While this is a good stash buster project, please think before you randomly pick up the lavender, chartreuse and florescent orange yarn. For a visual treat in color planning, visit Attic24 and click on the Crochet Category in the left sidebar.
Size: Basic granny squares are typically six inch crocheted squares with five concentric rows. For the loom knitted version, I decided on a smaller three row square utilizing a super bulky weight yarn which resulted in a four & one-half inch square when knitted on the large gauge Knifty Knitter Looms. However, by using the basic granny square formula, it would be very easy to add two more rows if you want a larger square.
Yarn: By using the super bulky Lion Brand Wool-Ease Thick & Quick only one strand of yarn was necessary to produce the desired look of the motif. You could substitute two strands of regular worsted weight yarn, but this technique requires picking up & placing stitches back on the pegs which makes it easier in the beginning if you are working with just one strand.
Looms: The red center of the motif above was made on the Knifty Knitter 12-peg Flower Loom. The remainder of the motif was knit using two pegs of a Hobby Lobby version of the Knifty Knitter 24-peg Round Loom. The Flower Loom could have been used for the entire project, but as the motif gets larger it is cumbersome to work through the small center of the Flower Loom. Since you are only using two pegs, any of the large gauge looms can be used for everything but the center.
Every time I use the crochet techniques on the loom, I make new discoveries and correct previous errors. Hopefully, this will make it better for others who decide to attempt this slightly fiddly technique. The two five & three year old grandchildren that live with us start to school Monday, so the tutorial should be ready in a few days.
Wednesday, August 12, 2009
Hair today, gone tonight
Every have one of those days when you look in the mirror and just can't take it anymore? Husband's out of town; three year old is climbing everything in the house; five year old is running wide open with a barking Chihuahua in pursuit; house needs cleaning; knitting to be done; and a fifteen year old Maltese follows and watches my every move in case my lap becomes available. Oh, there's plenty more, but I'm sure you get the picture. Today was a day of drastic measures - the hair had to go before I pulled it out. I usually avoid cameras, but decided on a whim to snap a before and after picture so you could see the "lady behind the loom".
 Noon today (before)
 Tonight (after)
Noon today (before)Tonight (after)Also, I discovered two or three months ago that I have a severe gluten allergy, in addition to being diabetic. This has prompted another major lifestyle change in dietary habits since I not only have to limit sugar and carbohydrates, but I'm now eating a gluten free diet. However, this has all been for the better, because I have lost close to 4o pounds over the past few months; dropped from a 2X to a 16 in clothing so far (I had gotten much larger than I was in this picture here); and I've had to cut back more than half on the amount of insulin I was taking.
I'm feeling better and better every day! Now, I just need to work on the makeup & exercise. Getting older sure requires a lot of maintaince.
I'm feeling better and better every day! Now, I just need to work on the makeup & exercise. Getting older sure requires a lot of maintaince.
Friday, August 07, 2009
Hexed & perplexed
 More experimentation - this is becoming "The Blog of the Mad Loomer." However, I think I've totally slipped this time and blurred the indelible line between knitting and crocheting. Oops, I forgot some folks don't consider loom knitting as "real" knitting; oh well, I laugh in the face of restrictive labeling and enter forbidden territory with careless abandon....ha, ha!! With that I present to you Hexed, a loom knitted hexagonal granny square based on crochet instructions.
Now you might ask, "Why not just crochet this little motif?" The answer to that started about three years ago, when I gradually got to where the numbness, tingling, cramping and pain became unbearable every time I tried to crochet. It was at this time I discovered the knitting looms and a alternative instrument for crafting yarn became a new passion. Even though it was love at first stitch, the looms do have some limitations that must be overcome or worked around, which for me is half the fun.
Hexed is one of those designs that was born out of an attempt to overcome the limitations of the loom. It is not my original design, but my translation of a crochet pattern from Attic24: Hexagon How-to as applied to the knitting looms. Since it is not my original design, I will not go into specifics regarding how it was made on the knitting loom, but I will give you some general guidelines.
Hexed was made using one strand of worsted weight yarn throughout in four different colors (Red Heart Super Saver in Aran white & lt. gold; Lion Brand Vanna's Choice in brick; Red Heart Soft in tangerine). The loomer's magic circle (see Watermelon Tutorial Pattern) made on the KK 12-peg Flower Loom formed the center. The remainder of Hexed was knitted on two pegs of the DA Loom's Regular Gauge Set Sampler. I used this loom because of its compact size and ease of use. Also, the gauge was compatible, though smaller, than the large gauge KK Loom. However, two pegs of any of the KK looms could have been used. Most of the stitches were made very similar to those used in the August Sun motif, except all the stitches were made through the whole stitch instead of just the back loop. When knitting through the whole stitch, both the front and back part of the stitch has to be picked up and placed back on the peg. If you have not used a fairly loose tension, this will be the most difficult part of knitting this design. I came close to giving up at this point, but finally worked through it with a mental note to keep the stitches looser the next time.
In order to get a side-by-side comparison, I had to endure the numbness and agony to crochet the counterpart. Here's quick visual comparison of the loom knitted motif (left) and the crocheted motif (right) made using the same pattern:
 The loom knitted version took just a little longer to make, but most of that was because I had to work through the stitch translation. The crocheted version at 4.5 inches across is a bit larger compared to the loom knitted version an even 4 inches. Finally, the crocheted design is more defined than the knitted version, but this may be due to my faulty translation.
As for being perplexed, I'm not really sure how you classify a technique that is made entirely on a loom using knit stitches translated from a crochet pattern. However, if you are interested in learning this technique, plus it makes a great coaster. All comments are welcome. If there is enough interest, I'll work up a tutorial.
Monday, August 03, 2009
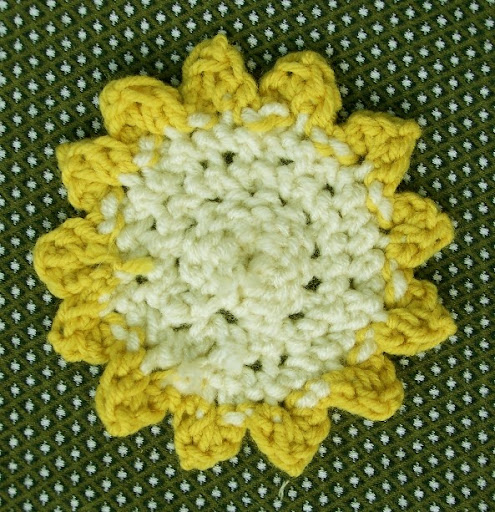
August sun motif
 My next blog post was going feature the brim I added to my short row hat, but things change. I had what's know as an epiphany regarding the edging techniques. This idea sort of grew out of several other edging experiments, but so far this one is my favorite. Most all the other techniques were based on I-cords in some variation or other; however, this one is not. In addition to the "shell stitch" petals, the center was revamped to form a more perfect circle.
To make this sun motif, I used two strands held as one of Red Heart Super Saver in Aran for the center and one strand in Gold for the petals. The twelve stitches of the LMC are doubled on the third row differently from the Watermelon Coaster. The Row 3 stitch sequence for each of the twelve stitches in the LMC are knitted as follows on two pegs of any large gauge Knifty Knitter Loom - I used the 48-peg Purple Hat Loom and worked in the back loops of the stitches:
Center
- Rows 1 & 2: The Loomer's Magic Circle (LMC) as described in the Watermelon Coaster Tutorial forms the first two rows.
- Row 3: Add the beginning loop to the right peg, wrap and knit off three times. This forms the beginning stitch.
- Still working in the first base stitch, place this loop on the left peg, wrap and knit off three times. Work a lifted bind off stitch as described in the Watermelon Coaster Tutorial. You now have completed two stitches in the back loop of the first LMC stitch.
- Lift the back loop of the next LMC stitch and place it on the left peg. *(Wrap and knit off three times; work the lifted bind off.) Place the same LMC stitch back on the left peg and repeat (*) once for a total of two stitches in the first LMC stitch.
- Repeat Step 4 for the remaining ten LMC stitches. End by hooking the last loop through the back loop of the first stitch. You should have 24 stitches for this row.
- Row 4: Work as for Row 3, but only increase every other stitch for a total of 36 ending stitches. End row as in Step 4 and tie off.
- Form a slip knot with one strand of the gold yarn and attach it in the back loop anywhere along the white edge. Wrap and knit off once.
- Lift the next back loop and place it on the left peg. (Note: The next five stitches will be worked in this same loop): *Wrap and knit off 3 times; work a lifted bind off. Repeat from * five times, but wrap and knit off 5 times on the third stitch - this forms the pointed petal.
- (Lift the next back loop, wrap and knit off once) repeat once.
- Repeat steps 2 & 3, ending with one single wrap stitch and tie off. There should be thirteen petals (lucky, lucky).
Saturday, August 01, 2009
Sunflower trio
 I love sunflowers! One of my first loom knitted flower projects was a sunflower. Since I've been on a coaster kick, I thought I would update the original sunflowers into coasters. Actually, these could be used not only as coasters, but also for decorative trim on other items as well. I intended to post these pictures a couple of weeks ago, but I just haven't found the time to blog lately. I've already moved on to several other projects, but I wanted to share my sunflowers with you. The center of these were made using the same technique I used for the first four rounds of the Watermelon Coasters. After that, I experimented with several different I-cord edgings for the yellow petals. The edging in all these were knitted directly on the edge of the brown center using two pegs on the Knifty Knitter Flower Loom; however, any large gauge loom could be used. Caron Simply Soft in yellow and brown were used on these three flowers.
Single edging
This is the first sunflower coaster with the simple single edging:
 The first petal was created by using two strands of yellow yarn as one and attaching it to one of the back loops on the brown edge to create the first loop. I then picked up the back loop of the next brown stitch and attached it to the adjacent peg to create the second loop. Using these two loops, I worked a five stitch I-cord and ended the petal by wrapping the second peg, knit off, lift and place the this loop on the first peg and knit off. To complete this petal and start the second one, count the next three free stitches from the I-cord stitch, lift the back loop of the third stitch and place it on peg next to I-cord bind off stitch. Repeat the five stitch I-cord sequence for the next petal. If you counted correctly, you should end up with twelve yellow petals.
Ruffled edging
The second flower has an extra full ruffled edging:
 Again I started with the first four rounds as used with the Watermelon Coasters. This will give you thirty-six chain stitches along the brown outer edge of the center. The petals were a variation of the previous sunflower, but much fuller. This was accomplished by using a three stitch I-cord, which makes a dense petal and attaching the petals on every second free stitch. If counted correctly you should end up with twenty-four petals - I have twenty-five and refused to frog it.
Double edging
This flower started the same way as the others, but has a double I-cord edging:
 I started this flower by recreating the single edge flower as described above. The second I-cord edging was created exactly the same as for the single edging, but instead of a five stitch I-cord I did a seven stitch I-cord before the bind off stitch.
I've really been enjoying the two-peg knitting technique. As soon as I get a chance, I'll show you a variation of this technique as applied to the brim of my Autumn Skullcap. I just know that you're gonna love it!
Subscribe to:
Posts (Atom)